Home NAS build - 2026 Edition
Short NAS Backstory
The last time I built an actual home “NAS” (which I just refer to as my “linux box”) was 2017. I actually had a blog post about it! Over the years it kind of became mostly my Home Assistant and Plex box, where I’d download stuff to watch and also run Prometheus and all my home monitoring junk.
Back then I went with 4x 4TB disks (4TB HGST HDN724040AL) that I bought from Newegg for $145.99 each - $36.50/TB. I played around with RAID5 but the performance was terrible so I reverted to my safe space, RAID10, and also went with ZFS, which was still relatively novel on Linux, because I wanted the snapshotting stuff. Over the years this worked out pretty well but over the past year or so it had crossed into the 90-95% full space. I also hadn’t upgraded the OS since 2020, and it was still running Ubuntu 20.04 LTS (with the HWE 5.15.x kernel), which reached EOL in April 2025. The real uh oh moment came when I checked the Power-On hours of my disks via smartctl:
/dev/sda: 77585 hours
/dev/sdb: 77507 hours
/dev/sdc: 77377 hours
/dev/sdd: 58359 hours
/dev/sde: 77714 hours
Almost 9 years of power-on time for the original disks (sdd is a replacement for a disk that failed). So … it was time. It was time to do a completely new build.
Mac Mini?
I’d been bouncing the idea around in my head for a couple years and my dream was to buy a Mac Mini with an external disk enclosure and boom, done. But there were some problems here. For one, I wanted a headless server, and while you can obviously SSH into a Mac, I didn’t want to deal with anything “weird,” I wanted a very boring fully supported hardware platform that would last 5-10 years.
First Attempt
The next best thing to a Mac Mini was a Mini PC. I’ve seen these for a couple years, and Micro Center in particular serves me ads for them like a crack dealer. After several weeks of deliberation I pulled the trigger and on December 10th I ordered a MINISFORUM UM890 Pro. The specs/price blew my mind. It had a Ryzen 9 8945HS, 32 GB ram, a 1TB SSD, and lots of ports, including Oculink, for $663 (after coupons). My plan was to get some kind of external disk enclosure that could wire directly into the PCI bus somehow, ideally via Oculink. I ordered the UM890 on December 10th and received it on December 23rd.
Unfortunately I hadn’t really researched the enclosure options, and it turned out there wasn’t really a good way to hook a decent enclosure up here. I assumed I could just go Oculink -> PCI -> disk enclosure (something like the QNAP TL-D400S), which was technically possible, but I’d need an Oculink->PCI adapter and then something to power the card. I originally wanted, but eventually ruled out, a USB enclosure like the TerraMaster D6-320, because I didn’t want to have to worry about any USB bridge issues or anything masking the disks’ SMART data. It took a couple weeks to receive the Minisforum but a couple days after receiving it I decided to return it and stick with something truer to my spirit: a regular old linux box with a regular set of components I buy from Newegg/Amazon. Fortunately there was no issue returning the Minisforum PC and their staff was super helpful, and I might end up ordering the same thing in a year or so if I need a “worker” box because the hardware platform and form factor was really impressive.
Second Attempt
Chassis
So I started doing research for a home NAS. Unlike in 2017 there is a ton of info, and a rich Youtube ecosystem of guys reviewing hardware for home lab / NAS builds. One of the best I found was NASCompares, who just reviewed everything imaginable, and most importantly for my need, dedicated NAS cases. My old 2017 box was slapped together in an old gaming PC tower chassis and the cooling was kind of crappy so I just left the door off, and over time it kind of got filled up with dog hair. But the case had space for 4 3.5" disks so, who cared. But this time I wanted something better. I ended up going with the Jonsbo N2 case, which can accommodate an ITX motherboard and 4 3.5" disks that plug directly into a SATA backplane.
Everything else
The next big decision was what CPU to go with. I’ve been an AMD fanboy for several years but the latest generation of Intel CPUs is pretty impressive, and critically, Plex has native support for Intel QuickSync using the onboard GPU, so that would be totally offloaded from the CPU. I ended up choosing the Core 5 Ultra 235 which seemed like a good sweet spot of performance per watt (65W TDP) and reasonably priced. For a motherboard I went with the ASRock B860 which has 4 SATA ports and 2 m.2 slots. I got 2 sticks of Corsair 16 GB DDR5-6000 and a Thermalright AXP90-X47 CPU fan. For an OS disk I went with a Samsung 990 Pro 2TB M.2 NVMe. Overkill? Probably, but why not? For PSU, Corsair SF750. Again, overkill, but why not.
Recertified HDDs?
This left the one major decision that I debated for days and days: what disks to get? I chatted with Gemini about this for a while and it suggested buying recertified datacenter drives. This seemed absurd - used hard disks? But after doing lots of research and looking into ServerPartDeals.com a bit (including their YouTube channel) I decided to give it a try (the 3 year warranty gave me some peace of mind). I gathered all the reliability data I could find, including the Backblaze disk failure report, and shoved it into Gemini and had a chat with the AI about the ideal disk. I was originally looking at getting some 16TB disks but ultimately went with 4x Western Digital Ultrastar DC HC570 WUH722222ALE604 0F48290 22TB for $349 each - $15.86/TB. The 4TB disks I’d bought back in 2017 were $36.50/TB, so while this was a big number, it was more than 50% cheaper per TB than I’d paid back then and more than 5x the total space. The motherboard only has 4 SATA ports, the chassis only has 5 bays, so I want to make sure I have plenty of space for them without having to think about expanding or rebuilding again for a few years.
The build
When everything arrived I put it together, which was pretty straightforward. I was really impressed with the Jonsbo case, especially with how the disks slide into the backplane on the rubber bumper/guides. I didn’t realize that the Intel 235 CPU came with its own fan, so I probably didn’t need the Thermalright, but it was rated highly for being quiet so I used the Thermalright and kept the OEM one in the Box O’ Junk along with all the extra PSU cables. Overall it was one of the easiest PC builds I’ve ever done except for connecting the chassis headers, which as usual was nearly impossible for Mr. Hot Dog Fingers.
Which OS
Once that was done I spent about 4 seconds debating what OS to install on it and then went with Ubuntu 24.04 LTS. I know about all the cool ones but I’m very familiar with Ubuntu at this point and it’s just the easiest for me since I use it every day at work and I’ve been farting around with it for about 15 years so it was the safe default. Only noteworthy part of this was how to get the OS onto the thing. I had a USB stick but it’s USB A and I only have my Macbook Pro with USB-C. I managed to find an adapter and then used “Balena Etcher” to burn the Ubuntu server ISO to the USB stick and went ahead with the install.
RAID 10 or RAID 6?
The next major decision, of course, was what raid level to use. I had been debating this literally for weeks as I waited for the parts to arrive. RAID10 vs RAID6 (RAIDZ2)? RAID10 sacrifices 50% of your capacity. RAID6 sacrifices 2 of your disks. In a 4-disk setup this comes out to basically the same number, so the decision comes down to better performance (RAID10) versus ability to lose any two disks (RAID6). I decided to just set up both and run fio tests.
Disk Health test
Before doing any of that, however, I had to do a sanity check of the factory-certified disks themselves. In my research about buying recertified disks a common refrain was the “bathtub” curve of disk failures - most happen very early in their lifetime, or at the very end, so it’s important to do some burn-in testing when you first receive them to check for DOAs and other issues. With an OS installed on the system I did some basic sanity checks, then kicked off a “smartctl” short test, which took a few minutes (all passed) and then a smartctl “long” test that took ~36 hours and also passed. Abbreviated SMART output is below, but this was something I was glad to have Gemini to help decipher:
smartctl 7.4 2023-08-01 r5530 [x86_64-linux-6.14.0-37-generic] (local build) Copyright (C) 2002-23, Bruce Allen, Christian Franke, www.smartmontools.org === START OF INFORMATION SECTION === Model Family: Western Digital Ultrastar DC HC570 Device Model: WDC WUH722222ALE604 Serial Number: 1RG2JSKW LU WWN Device Id: 5 000cca 407c127a8 Firmware Version: LNGNW730 User Capacity: 22,000,969,973,760 bytes [22.0 TB] Sector Sizes: 512 bytes logical, 4096 bytes physical Rotation Rate: 7200 rpm Form Factor: 3.5 inches Device is: In smartctl database 7.3/5528 ATA Version is: ACS-5 (minor revision not indicated) SATA Version is: SATA 3.5, 6.0 Gb/s (current: 6.0 Gb/s) Local Time is: Sun Jan 11 14:50:58 2026 UTC SMART support is: Available - device has SMART capability. SMART support is: Enabled === START OF READ SMART DATA SECTION === SMART overall-health self-assessment test result: PASSED General SMART Values: Offline data collection status: (0x82) Offline data collection activity was completed without error. Auto Offline Data Collection: Enabled. Self-test execution status: ( 0) The previous self-test routine completed without error or no self-test has ever been run. Total time to complete Offline data collection: ( 101) seconds. Offline data collection capabilities: (0x5b) SMART execute Offline immediate. Auto Offline data collection on/off support. Suspend Offline collection upon new command. Offline surface scan supported. Self-test supported. No Conveyance Self-test supported. Selective Self-test supported. SMART capabilities: (0x0003) Saves SMART data before entering power-saving mode. Supports SMART auto save timer. Error logging capability: (0x01) Error logging supported. General Purpose Logging supported. Short self-test routine recommended polling time: ( 2) minutes. Extended self-test routine recommended polling time: (2446) minutes. SCT capabilities: (0x003d) SCT Status supported. SCT Error Recovery Control supported. SCT Feature Control supported. SCT Data Table supported. |
Prior to running this test I had setup node-exporter on the new machine and had my old prometheus server scrape it so I could monitor temperature, fan speed, load, disk throughput etc during the disk tests. Throughput was basically nonexistent since the test was all inside the disk’s sata controller but the thermals looked good.
Fio test
Here’s the fio command I used for both tests:
fio --name=global \ --ioengine=libaio --direct=1 \ --time_based --runtime=3600 \ --group_reporting --stats=1 \ --size=200G --filename=fio_stress_test \ \ --name=usenet_ingest_seq_write \ --rw=write --bs=1M --iodepth=16 --numjobs=1 \ \ --name=plex_streaming_seq_read \ --rw=read --bs=4M --iodepth=4 --numjobs=1 \ \ --name=db_random_rw \ --rw=randrw --bs=16k --iodepth=32 --rwmixread=70 --numjobs=2 |
RAIDz2
RAIDz2 creation command:
root@lunix:~# sudo zpool create -f -o ashift=12 \ -m /lunix1/data1 tank raidz2 \ ata-WDC_WUH722222ALE604_1RGXZZ5W \ ata-WDC_WUH722222ALE604_1QGD46HW \ ata-WDC_WUH722222ALE604_1RG2JSKW \ ata-WDC_WUH722222ALE604_1PGBWAEV root@lunix:~# zpool list NAME SIZE ALLOC FREE CKPOINT EXPANDSZ FRAG CAP DEDUP HEALTH ALTROOT tank 80.0T 1.48M 80.0T - - 0% 0% 1.00x ONLINE - root@lunix:~# zfs create tank/benchmarks root@lunix:~# zfs set recordsize=1M tank/benchmarks root@lunix:~# zfs set atime=off tank/benchmarks |
RAIDz2 fio results:
| `root@lunix:~# bash fio_bench.sh usenet_ingest: (g=0): rw=write, bs=(R) 1024KiB-1024KiB, (W) 1024KiB-1024KiB, (T) 1024KiB-1024KiB, ioengine=libaio, iodepth=16 plex_streaming: (g=0): rw=read, bs=(R) 4096KiB-4096KiB, (W) 4096KiB-4096KiB, (T) 4096KiB-4096KiB, ioengine=libaio, iodepth=4 database_workload: (g=0): rw=randrw, bs=(R) 16.0KiB-16.0KiB, (W) 16.0KiB-16.0KiB, (T) 16.0KiB-16.0KiB, ioengine=libaio, iodepth=32 … fio-3.36 Starting 4 processes usenet_ingest: Laying out IO file (1 file / 512000MiB) Jobs: 4 (f=4): [W(1),R(1),m(2)][100.0%][r=117MiB/s,w=83.3MiB/s][r=86,w=104 IOPS][eta 00m:00s] usenet_ingest: (groupid=0, jobs=4): err= 0: pid=416458: Sun Jan 11 16:38:29 2026 read: IOPS=231, BW=197MiB/s (206MB/s)(692GiB/3600012msec) slat (usec): min=2, max=468394, avg=11160.20, stdev=17840.58 clat (usec): min=4, max=1479.5k, avg=200732.81, stdev=206196.08 lat (usec): min=249, max=1491.7k, avg=211893.01, stdev=210923.64 clat percentiles (usec): |
Destroy raidz2 and create raid10:
root@lunix:~# zpool destroy tank root@lunix:~# sudo zpool create -f -o ashift=12 \ -m /lunix1/data1 tank mirror \ ata-WDC_WUH722222ALE604_1RGXZZ5W \ ata-WDC_WUH722222ALE604_1QGD46HW \ mirror \ ata-WDC_WUH722222ALE604_1RG2JSKW \ ata-WDC_WUH722222ALE604_1PGBWAEV root@lunix:~# zpool list NAME SIZE ALLOC FREE CKPOINT EXPANDSZ FRAG CAP DEDUP HEALTH ALTROOT tank 40T 480K 40.0T - - 0% 0% 1.00x ONLINE - root@lunix:~# sudo zfs create tank/benchmarks sudo zfs set recordsize=1M tank/benchmarks sudo zfs set atime=off tank/benchmarks root@lunix:~# zpool list NAME SIZE ALLOC FREE CKPOINT EXPANDSZ FRAG CAP DEDUP HEALTH ALTROOT tank 40T 940K 40.0T - - 0% 0% 1.00x ONLINE - root@lunix:~# zfs list NAME USED AVAIL REFER MOUNTPOINT tank 696K 39.9T 96K /lunix1/data1 tank/benchmarks 96K 39.9T 96K /lunix1/data1/benchmarks root@lunix:~# |
RAID10 fio results:
| `root@lunix:~# bash fio_bench.sh usenet_ingest: (g=0): rw=write, bs=(R) 1024KiB-1024KiB, (W) 1024KiB-1024KiB, (T) 1024KiB-1024KiB, ioengine=libaio, iodepth=16 plex_streaming: (g=0): rw=read, bs=(R) 4096KiB-4096KiB, (W) 4096KiB-4096KiB, (T) 4096KiB-4096KiB, ioengine=libaio, iodepth=4 database_workload: (g=0): rw=randrw, bs=(R) 16.0KiB-16.0KiB, (W) 16.0KiB-16.0KiB, (T) 16.0KiB-16.0KiB, ioengine=libaio, iodepth=32 … fio-3.36 Starting 4 processes usenet_ingest: Laying out IO file (1 file / 512000MiB) Jobs: 4 (f=4): [W(1),R(1),m(2)][100.0%][r=182MiB/s,w=118MiB/s][r=157,w=162 IOPS][eta 00m:00s] usenet_ingest: (groupid=0, jobs=4): err= 0: pid=435593: Sun Jan 11 18:19:02 2026 read: IOPS=295, BW=248MiB/s (260MB/s)(871GiB/3600013msec) slat (usec): min=2, max=443885, avg=8673.65, stdev=14661.08 clat (usec): min=6, max=1532.5k, avg=156797.48, stdev=157700.12 lat (usec): min=249, max=1554.6k, avg=165471.13, stdev=161155.25 clat percentiles (usec): |
Results comparison
| Metric | RAIDZ2 (1 VDEV) | RAID10 (2 VDEVs) | Delta (%) |
| Read Bandwidth | 197 MiB/s | 248 MiB/s | +25.9% |
| Write Bandwidth | 91.5 MiB/s | 99.3MiB/s | +8.5% |
| Avg. Read Latency | 200.7 ms | 156.8 ms | -21.9% |
| 99th % Read Latency | 834.7 ms | 625.0 ms | -25.1% |
| Total IOPS (R+W) | 399 | 493 | +23.5% |
Unsurprisingly, RAID10 was faster in every metric. Having been burned in the past by RAID6 performance this was all I needed to push me into the warm embrace of RAID 10, so I destroyed the zpool and recreated it on RAID 10 just to have a fresh start and began migrating stuff over from my old box.
Charts from the fio tests
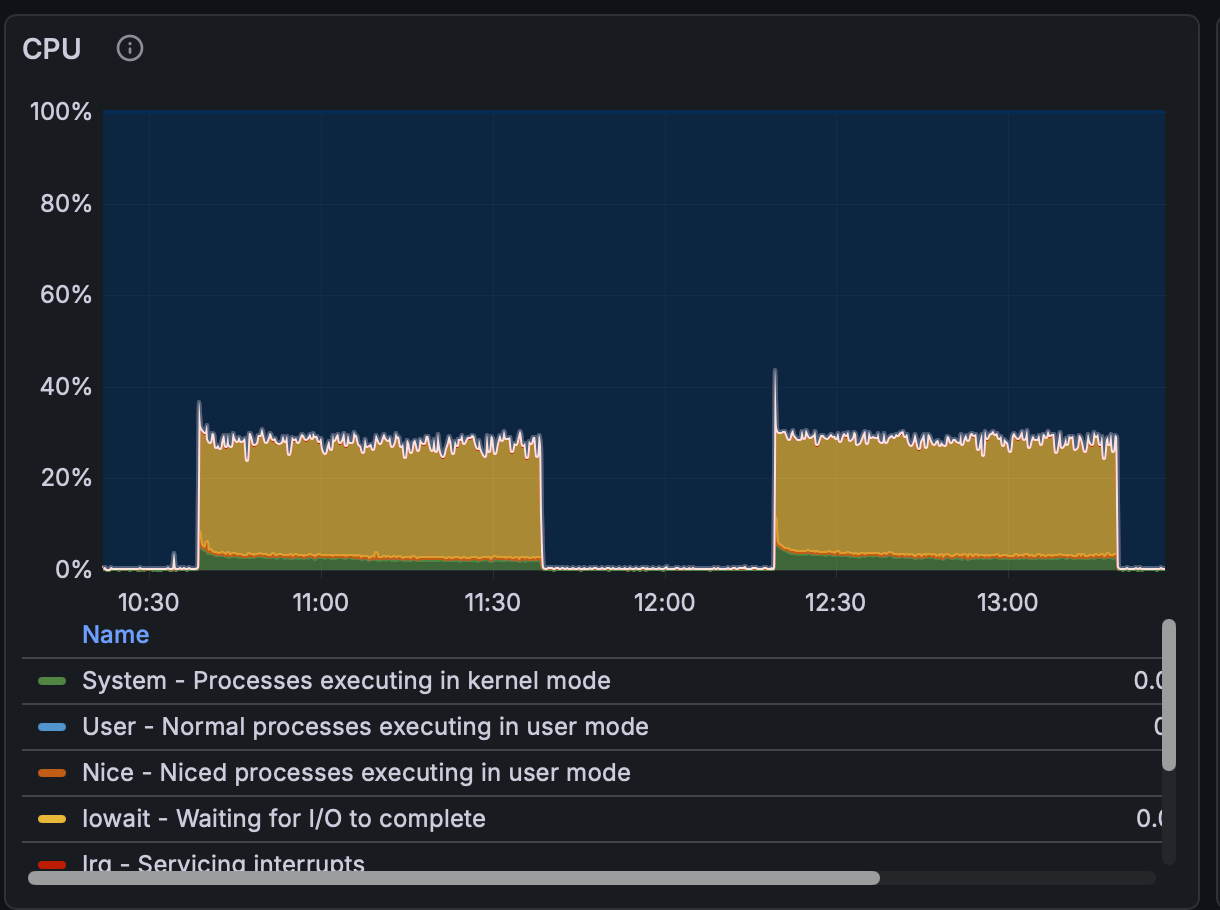
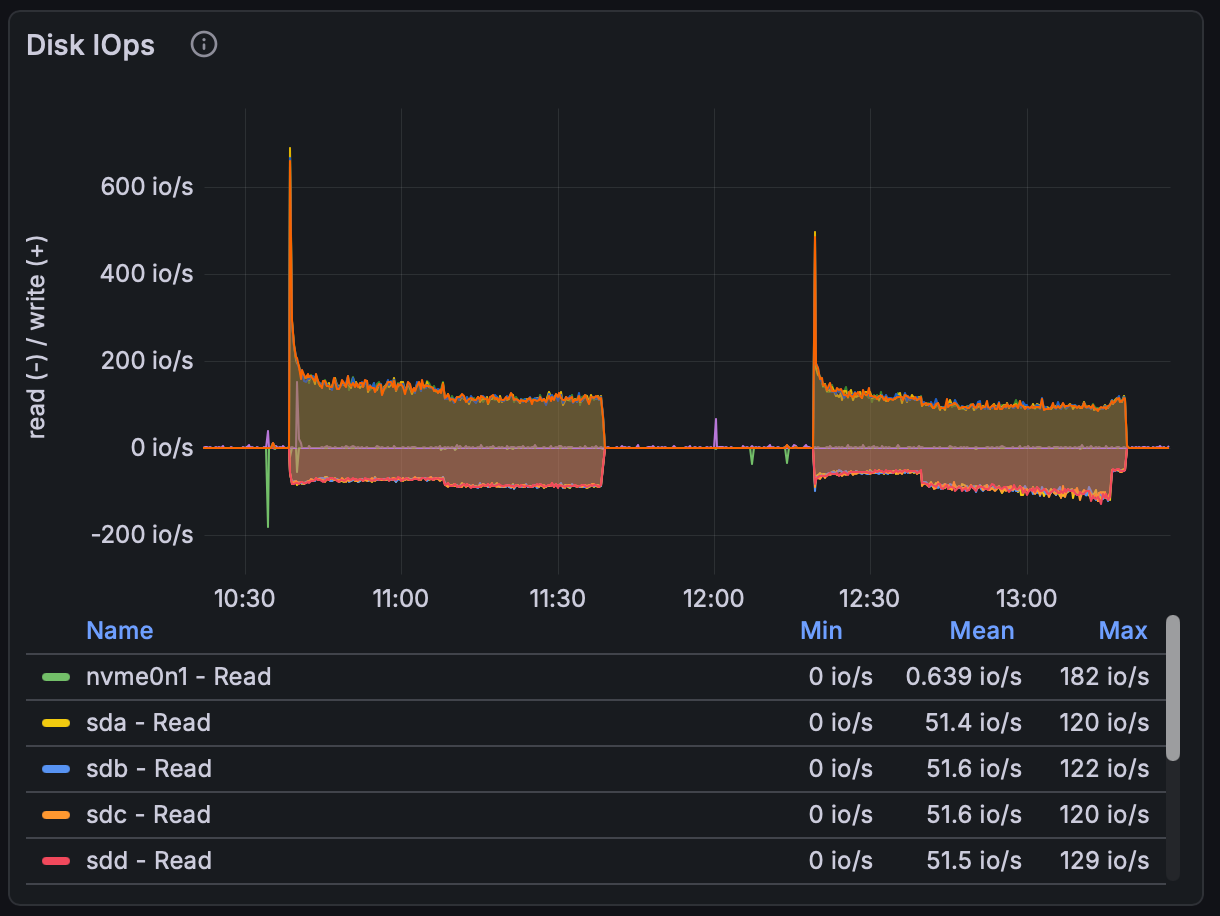
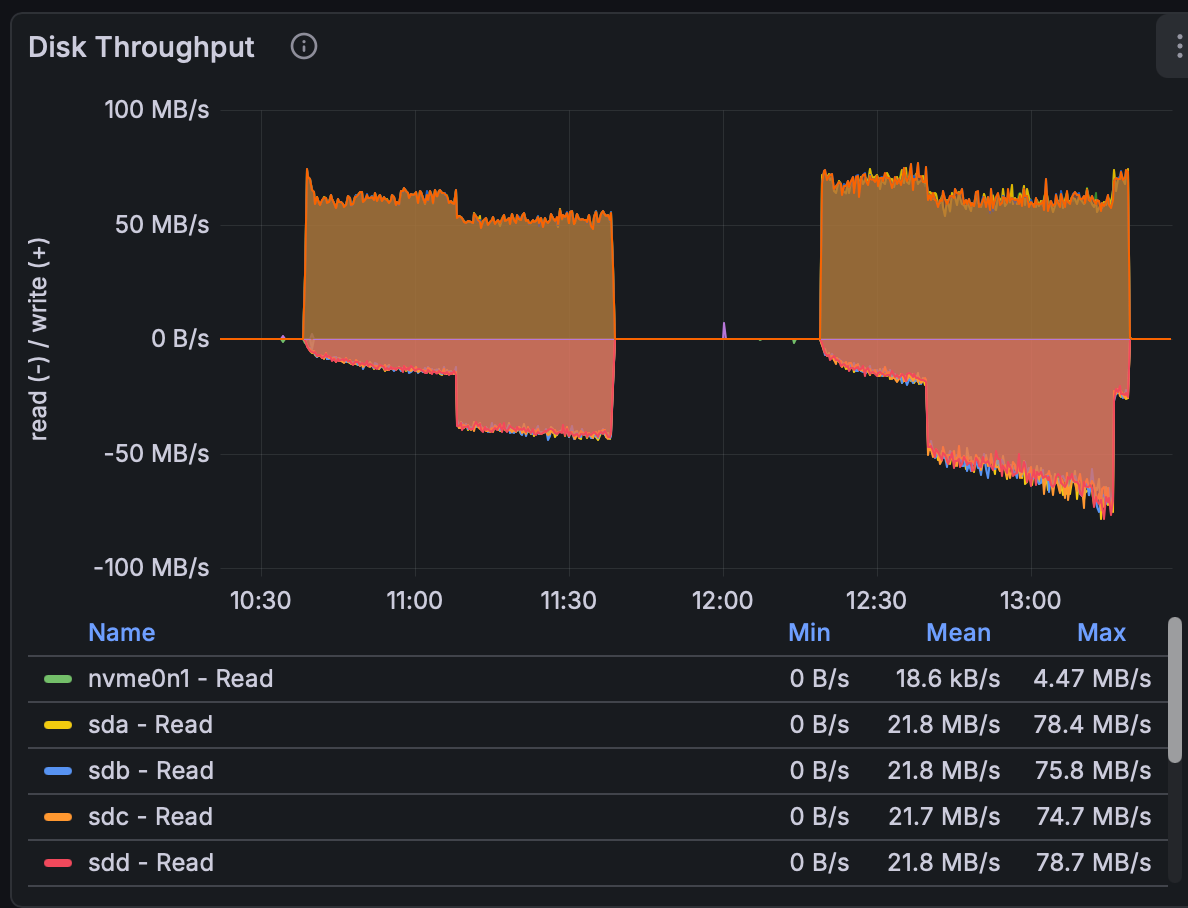
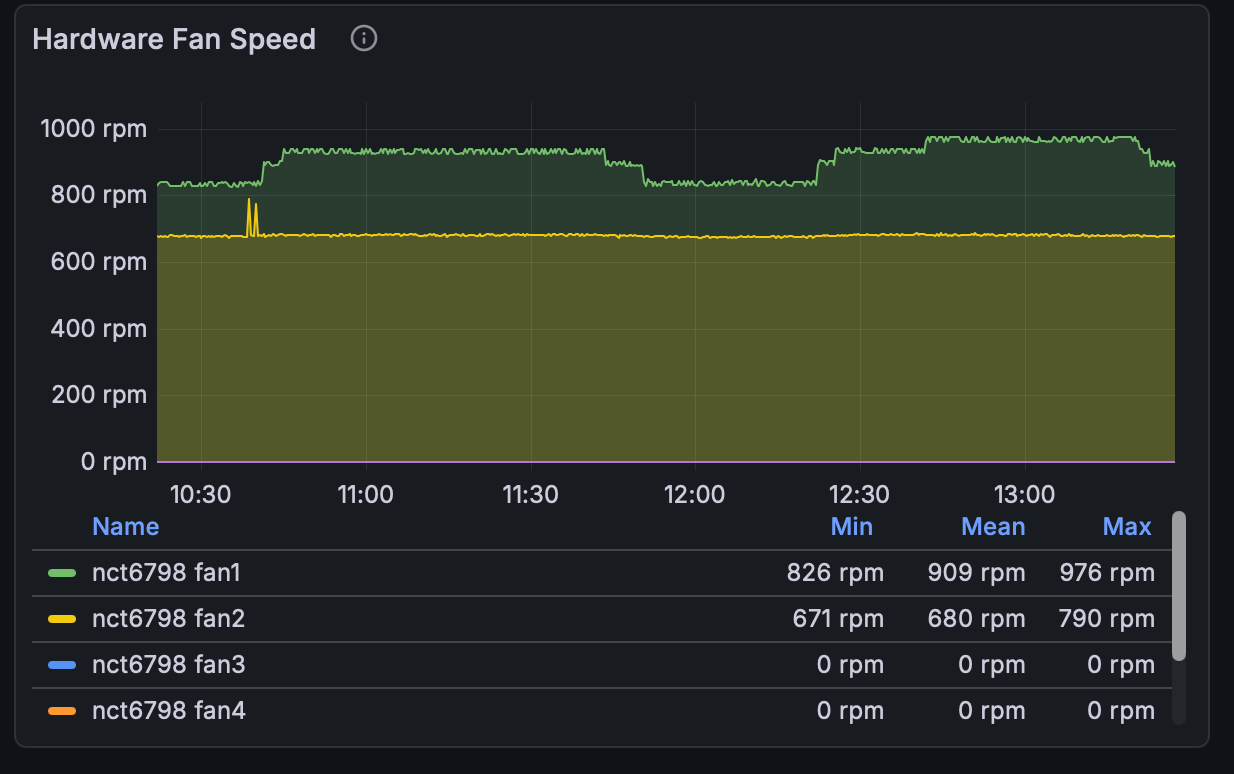
Below are node_exporter charts from the fio tests. The RAIDZ2 test was first.
CPU utiization
Disk IOPS:
Disk Bandwidth
Fan Speed
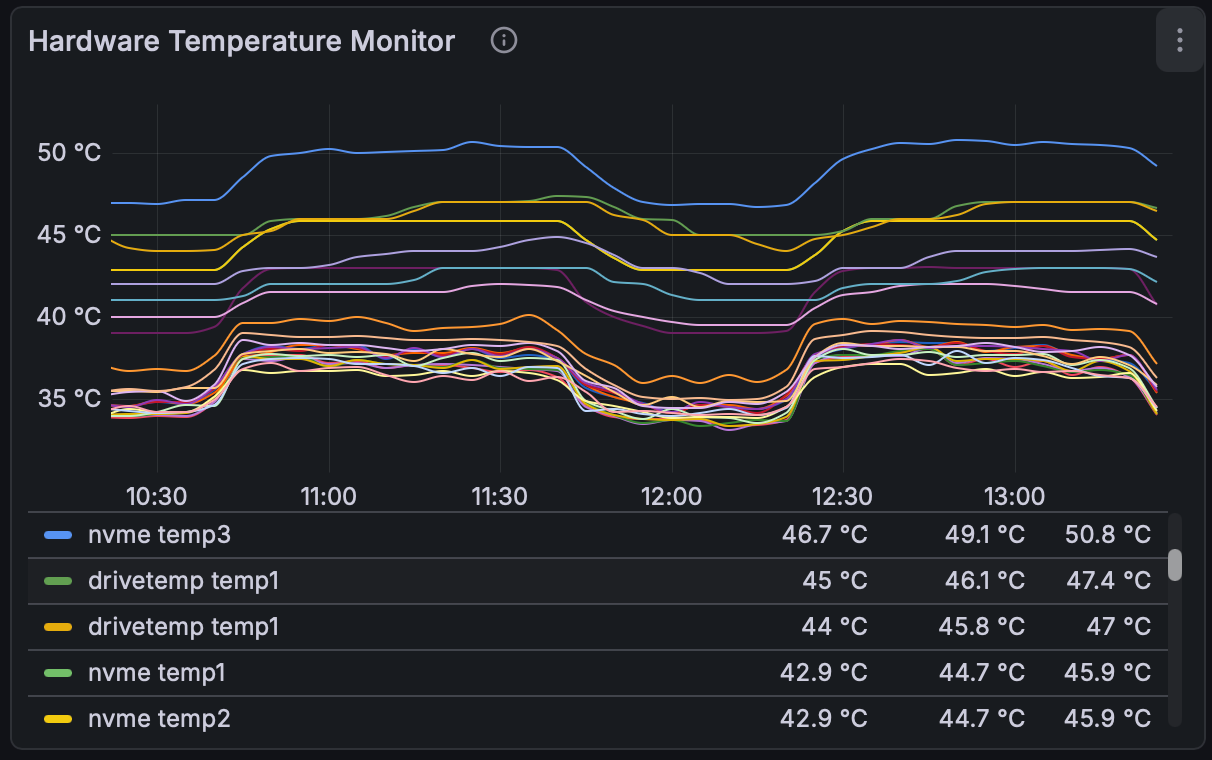
Temperatures (Disk and CPU)
Zpool and ZFS configuration
I created the zpool with a 1M recordsize to hold the big media files. I then created a couple volumes with 16k recordsize for config files and databases. The zpool command history is below.
2026-01-11.19:51:04 zpool create -o ashift=12 -o autotrim=off -O compression=lz4 -O atime=off -O xattr=sa -O acltype=posixacl -O normalization=formD -O mountpoint=/tank tank mirror /dev/disk/by-id/ata-WDC_WUH722222ALE604_1RGXZZ5W /dev/disk/by-id/ata-WDC_WUH722222ALE604_1QGD46HW mirror /dev/disk/by-id/ata-WDC_WUH722222ALE604_1RG2JSKW /dev/disk/by-id/ata-WDC_WUH722222ALE604_1PGBWAEV 2026-01-11.19:54:36 zfs set recordsize=1M tank 2026-01-11.19:55:29 zfs create tank/data 2026-01-11.19:55:40 zfs create tank/data/media 2026-01-11.19:57:23 zfs create tank/data/database 2026-01-11.19:57:41 zfs set recordsize=16k tank/data/database 2026-01-11.19:58:55 zfs destroy tank/data/database 2026-01-11.19:59:10 zfs create -o recordsize=16k -o logbias=latency tank/db_storage 2026-01-11.20:30:31 zfs create -o recordsize=16k -o logbias=latency tank/data/configs |
The Migration
Once I got the zfs volumes setup on the new box I started an rsync from old->new and I was surprised how slow it was. My home LAN is 1 Gbps and I’m able to get ~900 Mbps download from the internet over my Fios connection, but the rsync between these two machines was maxing out around 300 Mbps. After an hour of this slowness I started getting annoyed so I examined my rsync flags and tried a different encryption algo. In the past this led to a decent speedup but in this case it didn’t really do anything. I tried a couple other things but then noticed that one of my rsync flags was -z - compression. I didn’t need this since most of what I was moving was photos and videos that wouldn’t compress anyway. The ultimate command to get maximum throughput was:
evan@old-host:~$ sudo rsync -Wah --progress --stats -e 'ssh -c aes128-ctr -i /home/evan/.ssh/id_rsa' --rsync-path="sudo rsync" /lunix1/data1/public/Media/ evan@new-host:/tank/data/media/ |
With the above command I was getting around 950 Mbps which was much nicer to see. This still took a couple hours and then I had to deal with some chown/chmod issues but everything ended up where it needed to be.
Docker Cleanup
I should say at this point that my entire stack is defined in docker compose files I’ve cobbled together over the years. I feel like I should migrate this all into Kubernetes with k3s or something but I like it the way it is and the only real reason to Kubernize it would be for nerd points. Compose files are really easy for me to just check into github so I’m just gonna keep on doing it this way for now.
The reason this is worth mentioning is that one of the big differences in 2026 compared to 2017, when I built the previous NAS, and migrated everything into docker over the years, is that now we have Claude and Copilot. Since all my compose files are already in a git repo I had claude help clean them up and consolidate a bunch of them, and while I was at it, add in some new services that might be helpful. I had Overseerr, Sonarr, Radarr, etc but I had never heard of bazarr, for example. I had individual compose files for most of my stack but Claude helped combine the whole media stack into a single file that now stands the whole stack up with proper dependencies, matching UIDs, paths, private networks/internal DNS, etc. I did the same with my monitoring stuff - Home Assistant, Influx, Prometheus, Node exporter, and a bunch of other things now use the “monitoring” network rather than everything just using the default docker-compose bridge.
Plex and QuickSync
One of the reasons I went with an Intel CPU instead of an AMD was Plex’s support of QuickSync, which allows the GPU cores to offload the transcoding. I’ve never really been a fan of transcoding but mostly because I found it sucked and made performance overall tank. But in this case it was pretty trivial to get it working, I just had to expose /dev/dri in the docker compose file for Plex and it just worked. I installed intel-gpu-top and when transcoding I see the CPU usage stay flat but the GPU ramp up. Pretty awesome to see something work as intended. Plus now I can stream anything easily to my phone over LTE transcoded to low bitrate 720p or even 480p and it’s no issue.
DNS stuff
Since I was already fiddling around with the guts I figured it was a good time to give myself a real quality of life improvement and use DNS to access these services. For almost 10 years I was accessing stuff on my home network via http://192.168.42.23:7878 and while it was annoying, I managed to do it via bookmarks. I realize this is an embarrassing admission for a literal sysadmin, but I need to be brutally honest here about my own laziness. But since I was already mucking around in Nginx reverse-proxy configs I figured it was time to fix this long-standing problem. I tried path-based reverse-proxy (e.g. http://192.168.42.23/sonarr/) which made it a little easier (no need to remember port) but some services had no way to configure the base URL path, and I didn’t want to have different ways to access stuff, so I decided to just do good old virtualhosts. First I setup wildcard DNS for one of my domains, so *.domain.com pointed to the internal IP, then set up the virtual hosts in Nginx config (Claude made this less tedious). Then for the icing on the cake, I setup certbot with SAN so each service was accessible at https://service.domain.com to the internal IP. This probably was unnecessary - I could have just created my own internal CA, signed the cert myself, and trusted my own CA on my browser - but it was pretty easy to do so why not.
Gotchas
I ran into two issues that only seemed to affect Safari on iOS and MacOS - Edge on either device seemed fine. The first one was getting HTTP 421 errors in Safari, and after some digging I found this Cloudflare post indicating this is some kind of bug with Safari related to HTTP/2. Rather than try to debug this extensively I just disabled HTTP/2 on my vhosts. The other was related to split DNS. The TL;DR of this one was that I was able to use split DNS for A records but not for AAAA records, and Safari would use its secure DNS stuff and mess it all up. I actually don’t remember how I resolved this one, so I’m sorry to anyone else who encounters it and landed here looking for help, but I forgot to write it in my notes.
One other thing Claude helped with was making nice looking Nginx error pages. I got tired of those monochrome “Forbidden” pages so I asked claude to just make something nice and it did a pretty great job, highly recommend.
Monitoring
With the core functionality migrated I turned to prometheus and making sure the new box was monitored correctly. I setup cadvisor, node_exporter, smart_exporter and a bunch of my standard toys, but also discovered Beszel, which is really nice and very attractive for monitoring your home machines, so I wired that in too.
UPS Monitoring
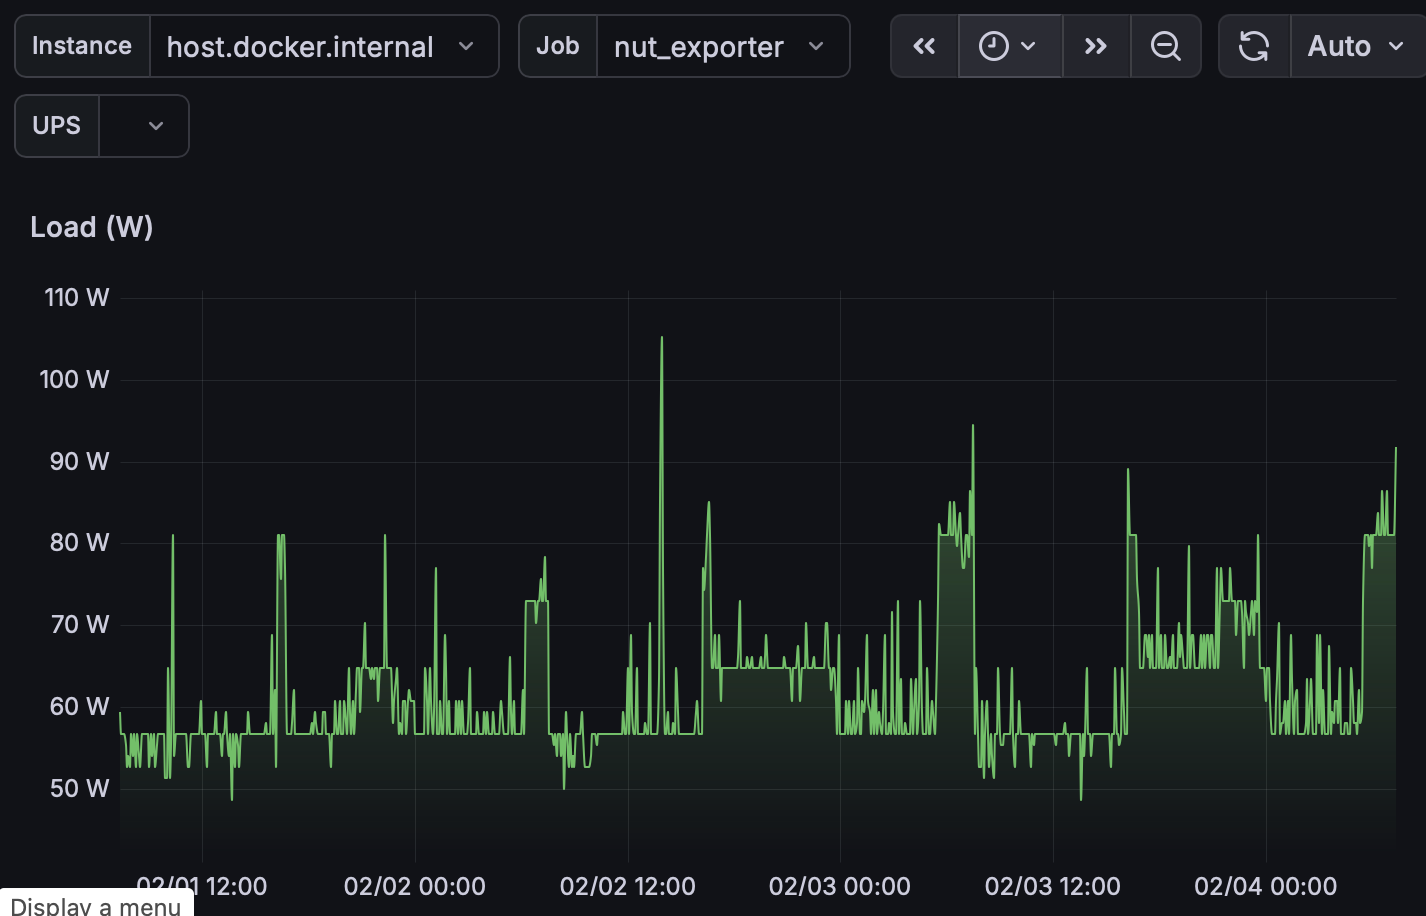
One thing I had wanted to do for a while was plug my server into the USB port on the CyberPower UPS I had it hooked into so I took the opportunity to do that as well. I installed Network UPS Tools (which required installing libgusb-dev in case that trips up anyone else) and then got this nut-exporter running which exposed most of the stuff I was interested in. One thing it didn’t seem to expose was “current load in Watts” - it only showed it as a percentage, but it did show the nominal rating, so calculating the Watts was just a matter of nominal x percentage in grafana. Currently the server is the only thing plugged into the UPS but obviously if I plug something else in this won’t accurately reflect the server’s load but for now this is fine.
Ghost sensors
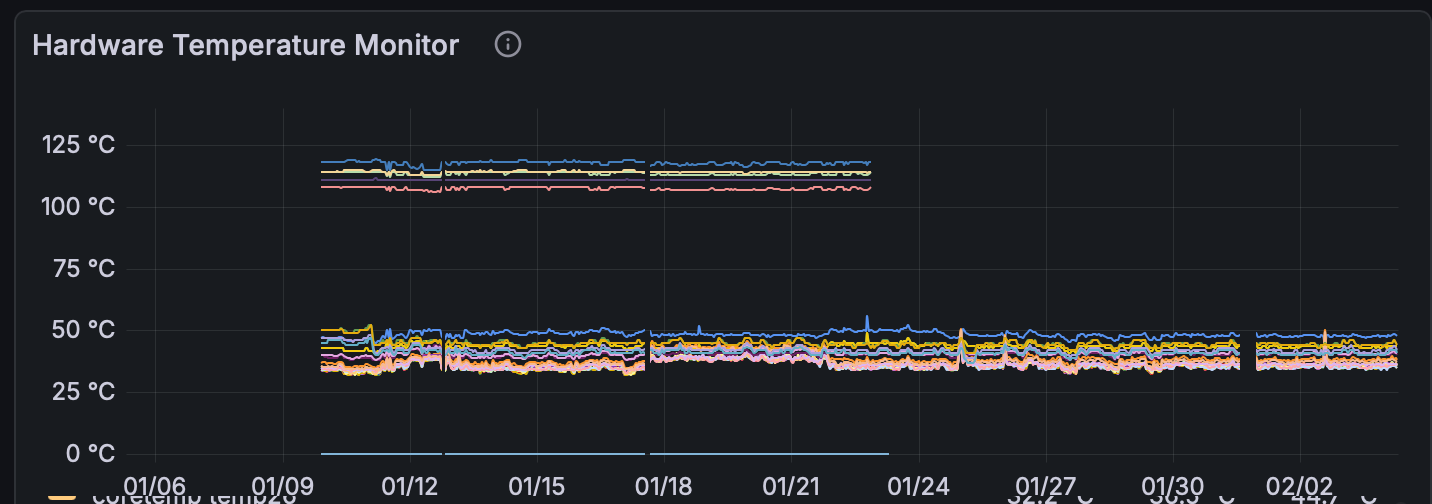
Another quirky bit was the motherboard’s sensors. The ASrock board uses the Nuvoton nct6798 and some of the sensors (detected by lm-sensors or hwmon) were reporting 120ºC or 0º which seemed impossible and was screwing up my graphs by scaling them so the real data were squished. See below…
In Beszel I configured the ignoring by adding this to the docker-compose file:
SENSORS: '-nct6798_systin,nct6798_auxtin*'
To do the same for node_exporter I had to add this to the “command” in the compose file:
- --collector.hwmon.sensor-exclude=platform_nct6775_656;temp([1345689]|1[0-9]+)
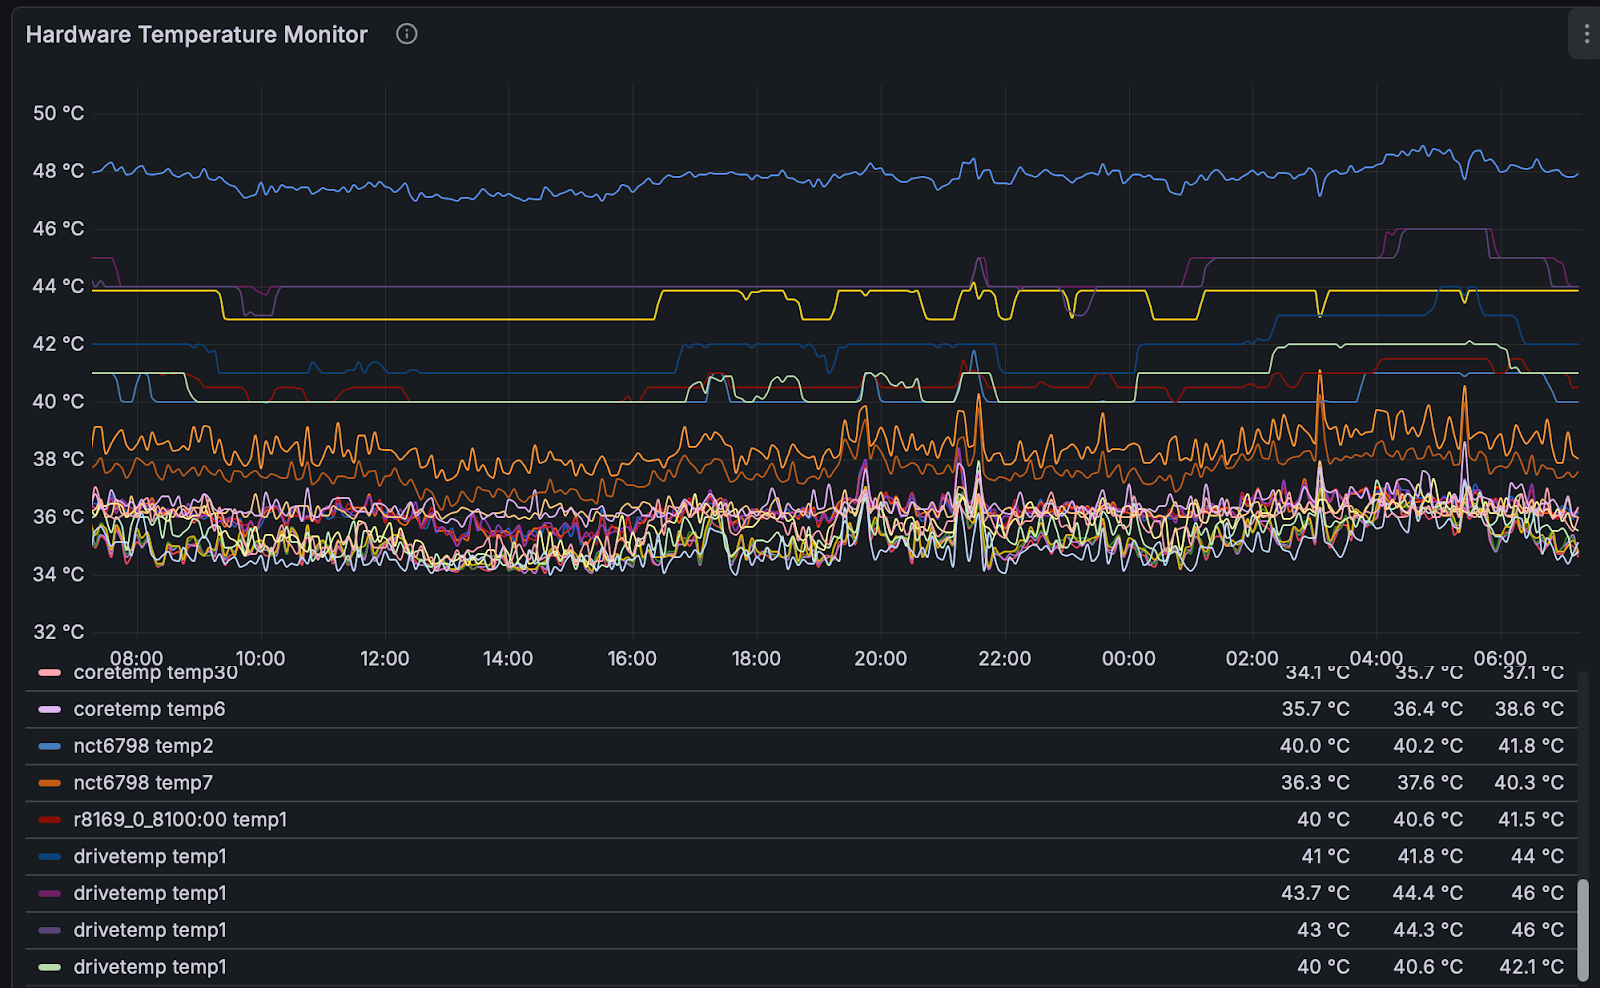
I now have temperature reporting for CPU, some random chassis sensors, the Samsung NVME disk, and the spinners. I have another panel with my office ambient temperature in there too. Some of this required tweaking lm-sensors config to rename or mask some sensors.
Takeaways
I mostly built this NAS to serve a purpose, but I’d be lying if I didn’t say the whole process was a lot of fun. From researching and deciding what to buy, to the physical build, to the OS and RAID config, to the migration, to the monitoring tweaks, I found it all very interesting and I was really impressed how much more information is available. Plus the advent of AI assistants like Gemini and Claude have really changed the game in a lot of ways. I did a lot of my research by uploading specs and datasheets to Gemini and creating dedicated Gems and then chatting about the whole project. It really was like having an assistant around to bounce things off or proofread config files - or in some cases, just have them write 10 config files. Pasting in a list of prometheus metrics and asking Claude to make a grafana dashboard JSON is a much better starting point than a blank slate where you have to add each panel.
It’s been almost a month since I cut most of my services over to the new machine and so far it’s been great. The recertified disks so far have been no problem. The machine in general is relatively quiet (except for the sound of the disk heads moving, but that doesn’t really bother me. I have the whole thing on my desk in my office for now but I’ll probably move it to where the old lived, and then rebuild that for some other purpose - it still has 4x 4TB disks so maybe I can use it as cold storage or something.
Final Parts list
Below is a list of each item I bought for this build and the price I paid in January, 2026.
| Component | Choice | Store | Price |
| CPU | Intel Core Ultra 5 235 3.4 GHz 14-Core Processor | Newegg | $289.99 |
| CPU Cooler | Thermalright AXP90-X47 42.58 CFM CPU Cooler | Amazon | $40.90 |
| Motherboard | ASRock B860I WiFi Mini ITX LGA1851 Motherboard | Amazon | $164.07 |
| Memory | Corsair Vengeance 32 GB (2 x 16 GB) DDR5-6000 CL36 Memory | Newegg | $393.99 |
| Storage | Samsung 990 Pro 2 TB M.2-2280 PCIe 4.0 X4 NVME Solid State Drive | Amazon | $228.57 |
| Case | Jonsbo N2 Mini ITX Desktop Case | Amazon | $137.59 |
| Power Supply | Corsair SF750 (2024) 750 W 80+ Platinum Certified Fully Modular SFX Power Supply | Amazon | $159.99 |
| Data Disks | 4x Western Digital Ultrastar DC HC570 WUH722222ALE604 0F48290 22TB 7.2K RPM SATA 6Gb/s 512e 3.5in Recertified Hard Drive | ServerPartDeals | $1,399.96 |
| SATA cables | SATA-III Cable:0.5M, 4Pcs/Set Thin 90-Degree SATA Right-Angle Cable SAS 6Gbps Data Angled to Straight for Server-Raid Computer SDD HDD CD DVD Drives (1.6FT) | Amazon | $9.99 |
| Total | $2,825.05 |